Vegetarian

Before you begin: Cooking your greens.

Did you know that you should never cook green vegetables with the lid on the saucepan?

Or that vegetables that grow beneath the ground such as potatoes, carrots etc. should always be started in cold water and that vegetables that grow above the ground such as beans, peas, broccoli, cauliflower, Brussels sprouts and cabbage should be started in boiling water?

Green beans

Did you know cutting a cross in the bottom of a Brussel sprout does not help it cook more evenly (unless steamed)? You are better off simply cutting the BS in half to cook.

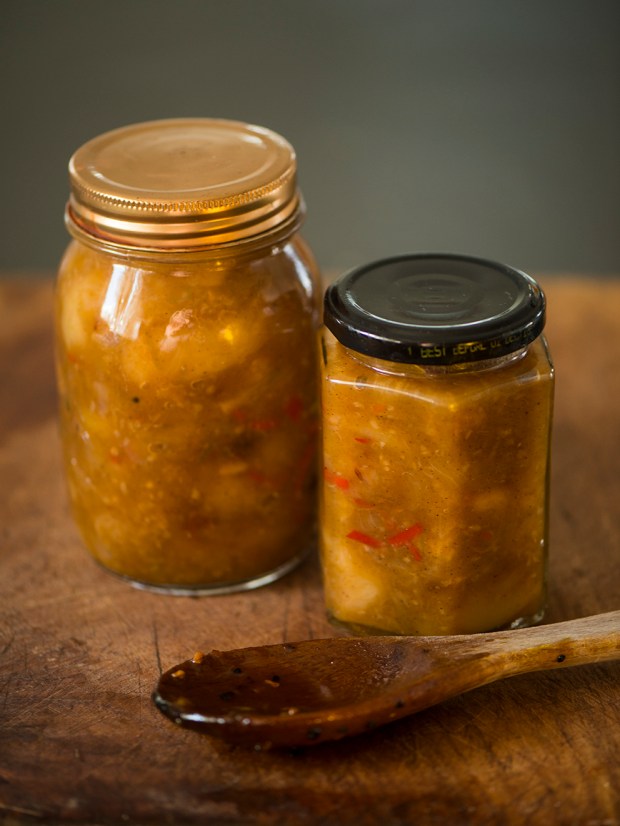
Peach and Mango Chutney

Peach and Mango Chutney

This experimental recipe was inspired by the fact that Margie was hanging out for another batch of Spiced Peach Chutney and that Brisbane has had a bumper crop of mangoes due to the dry season in 2000. I simply could not bear to see all those mangoes at the top of Dublin Street rotting in the gutter.

Peaches, peeled, stoned and chopped
Green mangoes, peeled, stoned and chopped

For every 500g of combined peaches and mangoes, add:

125g brown sugar
1 cup white wine vinegar
1 teaspoon ground allspice (pimento)
1 onion, finely chopped
Zest of 1 lime
Chopped flesh of 1 lime, all skin, seeds and pith removed
2 fresh long red chillies, seeded and finely chopped
3 cloves garlic, crushed
100g ginger, peeled and either grated or finely sliced
½ – 1 teaspoon sea salt

Heat olive oil in a heavy based saucepan over moderate heat. Add chillies, ginger and garlic and sweat until soft. Add onion and cook until onion is soft.
Grate the zest from limes. Remove all peel, pith and seeds, then roughly dice the flesh.
Add to the pan with the peeled, stoned and chopped peaches and mangoes
In a separate saucepan, combine brown sugar and white wine vinegar and stir over medium heat until sugar dissolves.
Add sugar and vinegar to the other ingredients, add allspice (if using) and sea salt. Simmer for 1 hour or until mixture becomes quite tacky and has a chutney consistency.
Spoon hot mixture into sterilized jars and seal whilst hot. Store in a cool dark place until opened and then store in the refrigerator after jars are opened.

Photo by: Feast Photography


Chickpea and Sweet Potato Cakes

Chickpea and sweet potato cakes

Sarah and I recently took Milly for a bite to eat at the Lido in Racecourse Road. I was absolutely starving so I ordered their tapas plate. (Ever hopeful!) Sarah followed suit and we both ended up with enormous platters of food which we couldn’t possibly hope to finish. The best were the chick pea and sweet potato (kumera) cakes that were absolutely delicious. Needless to say I bought sweet potatoes and chick peas to experiment the next day and while my experiments were cooking I began leafing through the current edition of Australian Gourmet Traveller. There, on page 54 was a recipe for Chickpea and Sweet Potato Cakes with Green Bean and Mint Salad. Coincidences I believe in, but that was just ridiculous!

Mine was nearly right.

800g orange sweet potato (kumera), cut into boiling size chunks
400g canned chickpeas, well drained
35g (¼ cup) plain flour
1½ teaspoons ground cumin
1½ teaspoons ground coriander
½ teaspoon ground cardamom
Salt and freshly ground pepper
Olive or grapeseed oil for frying

Cook the sweet potato in boiling salted water for 10 minutes or until tender. Drain well. Using a potato masher or ricer, mash until smooth. Add the chickpeas, flour and spices and mix together well. Mould dessertspoons of the potato mixture into rounds and place on a tray.

Heat 2 tablespoons oil in a heavy based frying pan over medium heat and cook the cakes (flattening them a little with a spatula) for 3 minutes on either side or until golden. Keep warm until ready to serve.

Serve with natural Greek yoghurt or tzatziki or raita to dip.

Serves 4.

 Photo by: self.com

Pumkin soup

20130803-202701.jpg

Queensland Blue* pumpkin, peeled and diced (quantities are difficult here)
3 – 4 large onions, chopped
Oil for cooking
Good quality chicken stock or vegetable stock
Nutmeg, grated
Cream, sour cream, or mascarpone
* If you want to be healthy and avoid cream, use home made almond milk
Salt and freshly ground pepper

Heat the oil in a heavy based frying pan, add onion and sauté until tender.

Add pumpkin in batches, and cook a little, making sure not to burn the onion.

Transfer onion and pumpkin to a heavy casserole, add chicken stock, and simmer gently until the pumpkin is tender.

Puree the pumpkin and onion mixture in a food processor, or pass through the fine sieve of a mouli.

Just before serving, stir in cream, sour cream, mascarpone (or almond milk), being careful not to add too much. Add a little grated nutmeg, and season to taste.

*Queensland Blue pumpkins are hard to find these days as they have very tough skins. To substitute, use another blue skin variety.

Herbs (handy tips)

Herbs

Milly* can keep herbs fresh for weeks. I was in charge of herbs on our last reef trip on ‘Taslander’, and no doubt will be again this year. Nobody could believe that they could last the distance. Because I have most herbs growing I tend to be lazy about storing them, but Milly is a marvel. First she washes them well, shakes them out to dry, then leaves them for an hour or so to dry completely. Then she places a double sheet of absorbent kitchen paper in the bottom of a plastic take-away container and adds the herbs.
Even Milly can’t help with coriander, which is the most impossible of all herbs to store fresh. It is quite easy to grow, but has the annoying habit of going to seed as soon as it reaches maturity. If you want coriander on hand at all times, chop it finely, and pack it into ice block trays. Cover with water and freeze. When frozen, remove the blocks of frozen coriander from the ice block trays, place in plastic bags and seal. The ice-blocks will keep indefinitely in the freezer.
Kaffir lime leaves, called ‘makrut’ in Thailand, are the peculiar double leaves of the Thai lime tree. They are available dried from any good Asian supermarket, but if you are lucky enough to have some friends (like Bob and Anne Douglass) with a kaffir lime tree, ask them if they could spare some leaves and simply freeze them in zip-up plastic bags.
A lot of people seem to think that dill and fennel are the same plant. They are not, although both have the same feathery tops and both have the same slightly aniseed taste. If planted together they will cross-fertilise and you will end up with either all dill or all fennel. I can’t remember which. If you don’t believe me, dill is Anethum graveolens, fennel is Foeniculum vulgare dulce. Why two such unrelated plants are able to cross-pollinate is beyond me. Fennel has a swollen bulb-like base, which tastes of aniseed; it is sometimes sold as ‘aniseed’ rather than fennel.
Greek basil is not the same as sweet basil. Greek basil is a perennial plant that will grow easily from a cutting. Sweet basil is used extensively in Thai and Vietnamese cooking. It has a larger leaf than Greek basil and is an annual, not a perennial, and can only be grown from seed. Never use Greek basil in Thai or Vietnamese cooking.

*Publishers note: Milly was mum’s mum who was given the nickname Milly for Mother-In-Law by my dad. I was about 4 before I realised that  she was my grandma because I only knew her as Milly. We called her that all her life. x

Photo: frugallysustainable.com

Eggs Florentine (Authentic)

Eggs Florentine (Traditional)

This recipe, like Eggs Benedict, is constantly being bastardised. Eggs Florentine, or more correctly, Oeufs poches florentine, is a creation of Auguste Escoffier, the father of modern French cuisine. It does not use hollandaise sauce, but bechamel sauce to coat the poached eggs. Escoffier did his Eggs Florentine as a sort of communal dish, containing up to 8 poached eggs. I think everybody nowadays would prefer their Eggs Florentine served in individual ramekins, or perhaps two poached eggs in cocotte dishes. The quantities here are Escoffier’s and, are very vague as all his receipts (yes, receipts) are.

250g spinach
6 – 8 poached eggs
Bechamel sauce
1 – 2 egg yolks
Grated cheese (I would use Gruyere or Parmesan)
Salt and freshly ground black pepper (presumably)

Cook the spinach in boiling salted water and drain thoroughly. Chop and return to the pan with a little butter. Cook for a few minutes, then turn into a fireproof dish. (I think I would wilt the spinach in a little butter, drain off the water released by the spinach, then transfer the spinach to a fine sieve. Press down on the spinach to release as much water as possible, then divide the spinach among the individual ramekins or cocotte dishes.)

Preheat the griller to hot.

Arrange the eggs on top of the spinach. These can be eggs poached in advance and reheated just before using.

Add 1 or 2 egg yolks to the standard bechamel sauce to prevent it turning under the griller, then coat the reheated and well-drained eggs with the sauce.

Sprinkle with grated cheese, add a little melted butter and brown lightly under the griller before serving.

(You could add the cheese to the white sauce, stirring well to melt it, and then coat the eggs with what would now be a mornay sauce. Brown lightly under the griller before serving.)

Serves 3 – 4 in cocotte dishes, 6 – 8 in ramekins.

(Photo from Delicious.co.uk)

Faux eggs ‘Florentine’

Faux eggs florentine cropped
This is really just another take on the Eggs Benedict theme….poached eggs with hollandaise sauce, sitting on, this time, spinach. True ‘Eggs Florentine’, it is not, despite the fact that many breakfast-serving Brisbane restaurants are calling it that. I guess you can call anything sitting on spinach ‘florentine’! Nevertheless, the egg, spinach and hollandaise combination is quite delicious!

4 thick slices of sourdough bread
Olive oil
1 clove of garlic (optional)
Baby spinach leaves
8 poached eggs (these can be poached in advance and reheated, as they would be in a restaurant situation)
Hollandaise sauce (see Sauces)
Cayenne pepper
Sea salt and freshly ground black pepper
Chives, trimmed, but left long, to garnish

Brush both sides of the sourdough slices with a little olive oil and place under a hot grill for 1 – 2 minutes each side, until crisp and golden. Rub one side of each slice with the garlic clove.

Top each slice of sourdough with a generous quantity of baby spinach, top the spinach with 2 reheated and well-drained poached eggs. Spoon hollandaise sauce over the eggs.

Sprinkle with a little cayenne pepper, then season with sea salt and freshly ground black pepper.

Garnish with the chives and serve immediately.

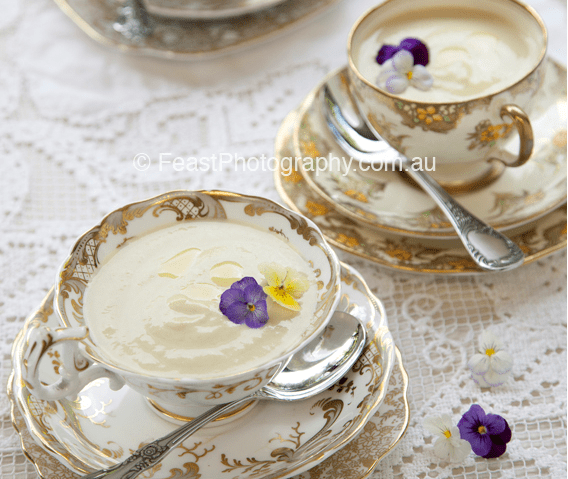
Almond milk and asparagus soup with truffle oil

This is not one of mum’s recipes but my own after my visit to The Sand End pub in Kate’s street in London. Saturday night was my first attempt and other than not being able to get the flower petals to garnish, it looked and tasted fantastic!

I made the almond milk from scratch as opinion seems to be that packaged almond milk has too much water added. I used raw almonds and it was very time consuming as you need to blanch the almonds and remove the skin. When I do it again, I’ll just buy blanched almonds although they do come at a premium price.

500g of blanched almonds
Hot water
3 bunches of asparagus
Lemon juice of one small lemon
Lemon zest
Chicken (or vegetable stock)
Truffle oil
Edible flowers (if available)

Pour boiling water over almonds and allow them to soften for 2 hours. Strain and add half the almonds to blender (500 grams is too much for most blenders). While blending the almonds slowly pour hot water into the blender – but do not add too much too quickly; you want a soup-like consistency. Repeat for the second half of the almonds.

Using a muslin cloth, strain the blended almonds and water mixture into a bowl. I hung mine up and let it drip, but still ended up squeezing the milk out by hand. The resulting liquid should be the consistency of milk but “grainier”.

Steam the asparagus to a firm but edible consistency – do not overcook. Drain and then place approximately two bunches of asparagus into the blender until it becomes a paste. The remaining asparagus is for garnish. Add the almond milk back into the blender and continue to blend. The resulting liquid should be still quite runny.

Pour the soup into a saucepan and add approximately 1 cup of stock, one piece of lemon peel and the juice of one lemon over a watched gentle flame. Heat the soup, continually stirring so that it does not stick to the base. As you do this the soup will thicken. You want the soup to become very thick so that you can thin it by adding more stock (but without adding so much that the subtle almond and asparagus tastes are over-powered).

Before serving, cut the remaining asparagus spears in half and add 2 spears to a shallow soup bowl. Remove the lemon skin and ladle the soup over the asparagus.

To serve, garnish with a drizzle of truffle oil and a pinch of lemon zest. If you happen to be able to find edible flower petals then this looks great.

Serves 4.

Risotto Milanese

Risotto Milanese is the traditional accompaniment to Osso Buco. In its genuine form, it contains beef bone marrow, though this is usually left  out of most modern versions of the risotto. Because I love beef bone marrow, I am putting it in.

375g arborio rice
60g butter
75g uncooked beef bone marrow, chopped
1 large onion, finely chopped
750ml chicken stock
250ml dry white wine
½  teaspoon saffron threads
30g butter extra
2 tablespoons Parmesan cheese, grated
Salt and freshly ground pepper

In one saucepan, bring stock to the boil, then reduce to a simmer.

In another large heavy-based pot or casserole, heat oil and cook onion until tender. Stir in the bone marrow, then add the rice and stir well until all the rice has been coated with the butter. Add wine and 1 cup of the hot stock and the saffron. Bring to the boil, stirring well. When liquid has almost evaporated, add more stock, stir until liquid has almost evaporated and continue to add stock and stir until the risotto is ‘al dente’, or cooked but still firm. Cooking is all done with the pot uncovered and should take about 20 minutes. The risotto should not be too dry.

When almost cooked, add extra butter and grated Parmesan and stir until melted. Serve at once.

Serves 6.

Before you begin – Shallots and Green onions

Image

Shallots, spring onions, scallions and now, ‘green onions’.  The word ‘shallot’ in a recipe always presents a dilemma. If the recipe book is written by an Australian, you can be fairly sure that what is meant by a shallot is a long green onion, rather like an overgrown chive. However, in an attempt to resolve an already confused situation, some Australian recipe books have begun referring to these as ‘green onions’.

A true shallot looks very much like a large clove of garlic. Also known here as a French shallot, its skin has a pinkish tinge, whereas garlic has white skin. There are also brown shallots, with brown skin. If you are reading a French recipe book and you have a choice, buy the French shallots. They are available here, but only at the better fruit and vegetable outlets. If you can’t buy French shallots, use small brown pickling onions as a substitute. Some Australian writers, such as Stephanie Alexander, have bitten the bullet and are calling a shallot a shallot.

In America, a shallot is a true French shallot. What we know as ‘shallots’ are called ‘scallions’. I do not know how this confusion arose, but I do wish somebody would fix it. That, of course, would mean re-educating every little fruit and vegie seller in Australia. Perhaps if the big supermarkets began a campaign, something might happen, but if there is no money in it for them, I can’t see it happening.

In this recipe book I have tried to be consistent and use the term ‘green onion’.